Is your trusty office or gaming chair slowly sinking into oblivion? Does it wobble like a faulty shopping cart, refusing to hold your preferred height? These frustrating issues often point to a single culprit: a failing gas lift cylinder. Before you resign yourself to buying an entirely new chair, consider a DIY replacement. Swapping out a gas lift cylinder is a practical and rewarding project that can save you significant money and restore your chair’s comfort and functionality, making it feel brand new.
Understanding Your Chair’s Gas Lift Cylinder
At the heart of every adjustable office and gaming chair lies a critical component known as the gas lift cylinder, also referred to as a pneumatic lift or gas strut. This cylindrical device, typically located at the center of the chair’s base, connects the seat to the wheelbase, enabling smooth and effortless height adjustments.
The mechanism behind a gas lift is surprisingly simple yet effective. Inside the cylinder, compressed gas (usually nitrogen) works in conjunction with a piston and a release valve. When you activate your chair’s height adjustment lever, it controls the flow of this compressed gas, allowing the piston to extend or retract, thereby raising or lowering your seat. This elegant system provides the fluid, controlled motion essential for ergonomic seating.
However, like any mechanical part, gas lift cylinders have a finite lifespan. Over time, due to consistent use, wear and tear, or exceeding weight limits, the internal seals can degrade, leading to gas leakage and a loss of pressure. This loss of pressure compromises the cylinder’s ability to maintain height, resulting in the common problems that signal it’s time for a replacement.
Signs Your Gas Lift Needs Replacement
Recognizing the symptoms of a failing gas lift cylinder early can save you from discomfort and potential safety hazards. If you notice any of these signs, it’s likely time to consider a replacement:
- Chair Constantly Sinks: The most common and unmistakable sign is your chair gradually lowering on its own, even when no pressure is applied to the adjustment lever. This indicates the internal seals are no longer airtight, causing the compressed gas to leak out.
- Difficulty Adjusting Height: If the height adjustment lever becomes stiff, unresponsive, or requires excessive force to operate, the cylinder’s internal mechanism might be damaged or obstructed by dirt and debris.
- Chair Feels Wobbly or Unstable: A stable base is crucial for both comfort and safety. If your chair feels unstable, uneven, or wobbles excessively, the gas lift cylinder might not be distributing weight properly, compromising the structural integrity.
- Creaking or Unusual Noises: Strange creaking, squeaking, or hissing sounds when adjusting height or shifting your weight can point to a lack of lubrication or worn internal parts within the cylinder.
- Sudden Drops or Jolts: Experiencing abrupt drops or jolts while sitting is an alarming sign of a serious gas cylinder malfunction, indicating a significant loss of internal support and stability.
- Visible Leaks or Residue: Occasionally, a failing cylinder might show signs of leaking hydraulic fluid or leave a sticky residue on the floor, signaling a worn-out seal that requires immediate attention.
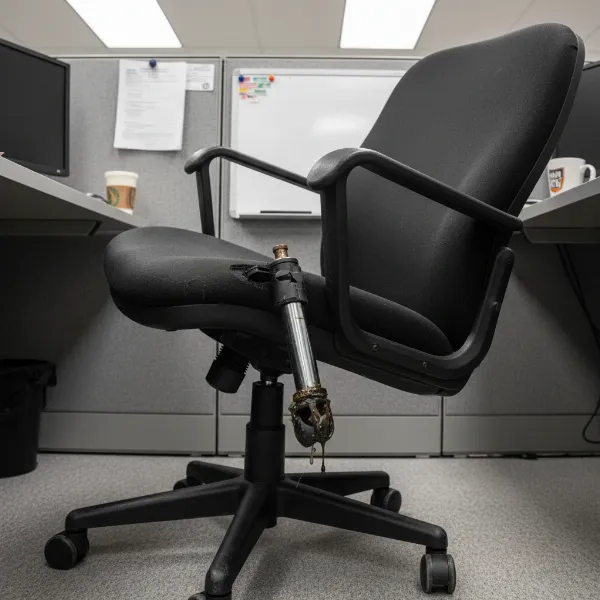 An office chair with a clearly visible faulty gas lift cylinder, sinking or wobbling unnaturally.
Gathering Your Tools and Replacement Parts
Before you begin, ensure you have the right equipment. Having everything ready will make the replacement process smoother and safer.
Essential Tools
- New Gas Lift Cylinder: Critically, this must be compatible with your chair. Cylinders come in various classes (e.g., Class 2, 3, 4), lengths, and diameters. Measure your old cylinder or check your chair’s specifications to ensure a perfect fit. A Class 4 cylinder is generally recommended for durability and higher weight capacity.
- Pipe Wrench or Large Adjustable Wrench/Pliers: Essential for gripping and twisting the cylinder, especially if it’s firmly stuck to the seat mechanism.
- Rubber Mallet: Ideal for gently tapping components loose without causing damage.
- Hammer (Metal): For stubborn situations where the rubber mallet isn’t sufficient. Use with caution to avoid damaging chair parts.
- Penetrating Lubricant (e.g., WD-40): Invaluable for loosening rust, grime, or tightly friction-fitted components.
- Protective Gloves: To improve grip and protect your hands from grease, dirt, and potential scrapes.
- Protective Eyewear: To shield your eyes from any debris or unexpected slips during hammering.
- Screwdriver (Flathead or Phillips): May be needed to remove any plastic covers around the cylinder.
- Soft Cloth or Cardboard: To protect your floor from scratches, grease, or dirt during the process.
|
Our Picks for the Best Gaming Chair in 2026
As an Amazon Associate I earn from qualifying purchases.
|
||
| Num | Product | Action |
|---|---|---|
| 1 | Razer Iskur V2 X Ergonomic Gaming Chair: Built-in Lumbar Support - Widened Seat Base - High Density Foam Cushions - Adjustable 152 Degree Recline - 2D Armrests - Plush Fabric Finish - Black |

|
| 2 | Ergonomic Office Chair with Footrest - Adjustable Lumbar Support & Headrest, 90-160° Reclining Mesh Back Computer Chair - Home Office/Gaming, 350lbs Capacity (SGS Certified) |
|
| 3 | Sweetcrispy Computer Gaming Desk Chair - Ergonomic PU Leather with Comfy Lumbar Support, Height Adjustable Rolling Desk with Flip-up Armrests, for Home and Office |
|
| 4 | Gaming Chair with Linkage Armrest & Footrest, High Back Video Gaming Chair, Black/White |
|
| 5 | BestOffice High-Back Gaming Chair PC Office Chair Computer Racing Chair PU Desk Task Chair Ergonomic Executive Swivel Rolling Chair with Lumbar Support for Back Pain Women, Men,White |
|
| 6 | GTPLAYER Gaming Chair,Office Chair with Pocket Spring Lumbar Support, Ergonomic Comfortable Wide Office Desk Computer Chair with Outward Fixed Soft Armrests and Footrest (PU Leather, Black) |
|
| 7 | TRALT Office Chair Ergonomic Desk Chair, 330 LBS Home Mesh Office Desk Chairs with Wheels, Comfortable Gaming Chair, High Back Office Chair for Long Hours (White) |
|
| 8 | Breathable Fabric Gaming Chair with Footrest, Height Adjustable Game Chair, Video Gaming Chair for Gaming Room, Living Room and Office - Blue/Light Grey |
|
| 9 | BestOffice Gaming Chair Office Chair Ergonomic Desk Chair Racing Style Gaming Chair with Lumbar Support, Swivel Rolling Base, and Comfortable Padded Seat for Women and Men |
|
| 10 | Gaming Chair, 400 lbs Adult Chair, High Back Computer Chair with Footrest and Linked Armrests, Office Video Game Chair with Lumbar Support (Grey) |
|
Choosing the Right Replacement Cylinder
Gas lift cylinders vary by class, length, and diameter. The class indicates its weight capacity and durability (Class 4 being the strongest). The length determines the chair’s adjustable height range. The diameter of both the top piston and the wider cylinder body must match your chair’s existing components for a secure, wobble-free fit. Always verify these specifications before purchasing a new cylinder.
Step-by-Step Guide: Replacing Your Gas Lift Cylinder
Replacing your gas lift cylinder is a straightforward process that requires patience and the right technique. Follow these steps carefully to ensure a successful outcome.
Preparation is Key
First, clear a spacious work area and lay down a protective cloth or cardboard to prevent scratches and contain any grease or debris. Safety is paramount, so put on your protective gloves and eyewear before you begin. If your chair has electrical components, ensure they are unplugged.
Detaching the Chair Base
- Flip the Chair: Carefully turn your chair upside down, placing it on a stable surface (like another sturdy chair without arms, or directly on your protected floor). Ensure the chair is stable and won’t tip over.
- Locate the Cylinder: You will see the gas lift cylinder protruding through the center of the chair’s five-star wheelbase.
- Remove the Wheelbase: With one hand holding the wheelbase, use your rubber mallet to firmly tap the bottom of the gas cylinder where it meets the base. Tap around the circumference of the cylinder. The wheelbase should eventually come free after several forceful taps. For stubborn bases, apply a penetrating lubricant like WD-40 around the joint and let it sit for 10-15 minutes before trying again.
Removing the Old Cylinder from the Seat Mechanism
This step is often the most challenging, as the cylinder can be very tightly friction-fitted into the seat mechanism after years of use.
- Access the Top: Once the wheelbase is off, you’ll have better access to the top of the cylinder where it connects to the seat mechanism. Some chairs may have plastic covers that need to be removed with a screwdriver.
- Apply Lubricant: Liberally spray penetrating lubricant around the top joint where the cylinder enters the seat mechanism and let it soak for a few minutes.
- Use a Pipe Wrench: Securely grip the body of the gas cylinder with your pipe wrench. Apply strong rotational force, twisting it back and forth to break the friction seal. It might require significant effort and repeated attempts.
- Tap from Above (Optional, for stubborn cases): If twisting isn’t enough, position the chair so the seat mechanism is supported. With a hammer, carefully tap the top of the cylinder where it meets the seat mechanism. Alternatively, if the cylinder is extended, you can sometimes tap the top piston with a mallet while simultaneously pulling on the cylinder from below.
- Perseverance: This step requires patience. If it’s incredibly stuck, reapply lubricant, wait longer, and use more leverage with your pipe wrench. Some users even resort to gently heating the area with a heat gun, though this should be done with extreme caution.
“Removing the gas cylinder isn’t rocket science but takes some muscle and patience. Follow these steps carefully to avoid damage or injury.”
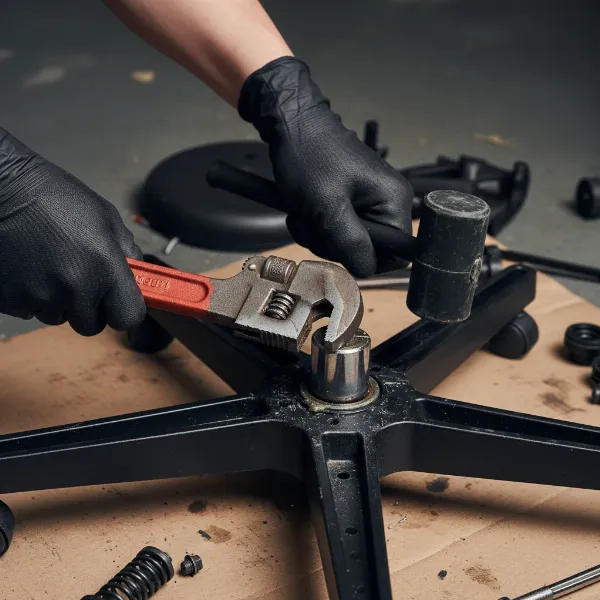 Hands using a pipe wrench and rubber mallet to remove a stubborn gas lift cylinder from a chair base.
Cleaning and Preparing for New Installation
Once the old cylinder is removed, take a moment to clean any dirt, grease, or debris from the mounting holes in both the seat mechanism and the wheelbase. This ensures the new cylinder will seat properly and securely. Inspect both parts for any damage or wear.
Installing the New Gas Lift Cylinder
- Remove the Plastic Cap: New gas lift cylinders often come with a small plastic cap covering the piston at the top. This must be removed before installation, or the cylinder will not function.
- Insert into Seat Mechanism: Carefully slide the top (skinnier end) of the new gas lift cylinder into the central hole of the seat mechanism. It should slide in easily and sit snugly due to friction fit.
- Reattach the Wheelbase: Place the chair’s wheelbase back onto the bottom (wider end) of the new gas cylinder.
- Seat the Cylinder: With the chair upright, sit down firmly on the chair. Your weight will help press and securely friction-fit both ends of the cylinder into place. Test the height adjustment to confirm smooth operation.
Troubleshooting Common Issues During Replacement
Even with a detailed guide, you might encounter some common challenges.
- Cylinder Stuck to Base: If the wheelbase won’t come off, ensure you’re tapping the cylinder directly where it enters the base. Lubricant is your best friend here, combined with firm, even taps around the circumference.
- Cylinder Stuck to Seat Mechanism: This is usually the toughest part. Don’t be afraid to use significant leverage with a pipe wrench. If all else fails, consider using a metal hammer with a block of wood to tap directly on the mechanism around the cylinder, or explore the cautious use of heat (though a professional is advised for this).
- New Cylinder Not Seating Properly: Ensure all debris is cleared from the holes. If the plastic cap wasn’t removed from the new cylinder’s piston, it will prevent proper function. Apply firm downward pressure (by sitting on the chair) to fully seat it.
Maintaining Your Chair for Longevity
Replacing your gas lift cylinder is a great way to extend your chair’s life. To ensure its continued performance and prevent future issues, consider these maintenance tips:
- Regular Cleaning: Keep the exposed parts of the gas cylinder and the chair’s base clean from dust and debris.
- Avoid Exceeding Weight Limits: Always adhere to the manufacturer’s recommended weight capacity to prevent undue strain on the cylinder.
- Proper Use of Adjustment Levers: Use smooth, controlled movements when adjusting your chair’s height. Avoid sudden jerks or slamming the lever.
- Periodic Inspection: Occasionally check the cylinder for any signs of wear, wobbling, or slight sinking, addressing minor issues before they become major problems.
Conclusion
Replacing your chair’s gas lift cylinder is a manageable DIY project that can significantly extend the life of your favorite office or Gaming Chair. By understanding the common signs of failure, gathering the right tools, and following these step-by-step instructions, you can restore your chair’s comfort, stability, and height adjustment capabilities. Don’t let a sinking feeling lead to a new purchase; empower yourself with this simple fix and get back to comfortable, ergonomic seating.
Ready to take on the challenge and revive your chair?
Frequently Asked Questions
How long do gas lift cylinders typically last?
The lifespan of a gas lift cylinder can vary based on quality, usage frequency, and weight capacity. Generally, a good quality cylinder can last anywhere from two to ten years, with heavier daily use potentially shortening its lifespan to two to three years.
Are all gas lift cylinders the same size, or can I use a universal one?
No, not all gas lift cylinders are the same size. While many share similar basic designs, they come in different classes, lengths, and diameters. It is crucial to measure your old cylinder’s dimensions (piston diameter, cylinder body diameter, and overall length) to ensure compatibility with your chair.
Can you fix a leaking gas cylinder, or does it always need replacement?
Unfortunately, a leaking gas cylinder cannot be repaired. Once the internal seals fail and the compressed gas begins to leak, the only effective solution is to replace the entire gas lift cylinder with a new one.
Is it safe to replace a gas lift cylinder myself, or should I hire a professional?
Replacing a gas lift cylinder is generally safe for DIY enthusiasts with basic mechanical skills. However, it requires careful handling of tools and some physical effort. Always wear protective gear, clear your workspace, and if you are unsure or uncomfortable at any point, it’s best to consult a professional chair repair service.