Moving house or taking your beloved gaming setup on the road can be a daunting task, especially when it comes to larger, more complex items like your gaming chair. While designed for comfort and durability, many gaming chairs are not inherently travel-friendly in their assembled state. Attempting to transport a fully assembled chair can lead to damage, awkward maneuvering, and unnecessary bulk. Fortunately, most gaming chairs are designed with modular components that allow for relatively straightforward disassembly, making them much easier to pack, move, and store safely. This comprehensive guide will walk you through each step of taking apart your gaming chair, ensuring it arrives at its new destination intact and ready for reassembly.
Understanding Your Gaming Chair’s Structure
Before you begin, it’s helpful to understand the basic components of a typical gaming chair. While designs vary between manufacturers, most chairs share a core structure comprising a five-star base with caster wheels, a gas lift cylinder for height adjustment, a seat with an attached mechanism, a backrest, and adjustable armrests. Disassembling your chair involves systematically separating these main parts. This process not only facilitates easier transport but also provides an excellent opportunity for cleaning or inspecting individual components for wear and tear.
Essential Tools for Disassembly
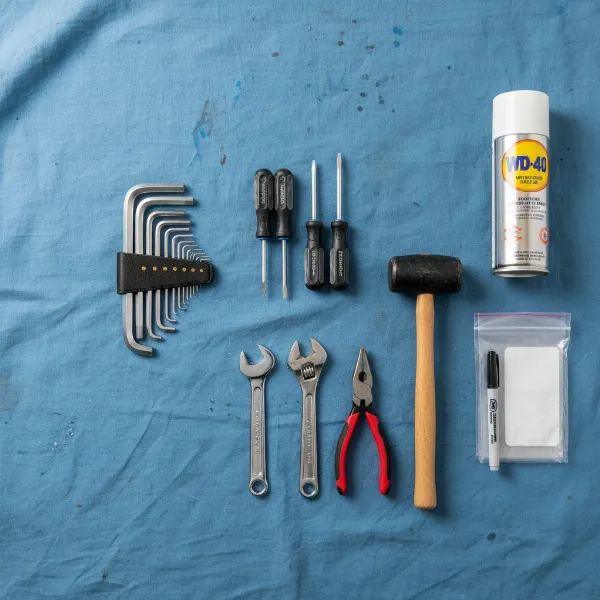
Having the right tools on hand will make the disassembly process smoother and prevent potential damage to your chair. Most of the tools required are standard household items, and some gaming chairs even come with an assembly kit that includes the necessary Allen wrenches.
Here’s a list of commonly needed tools:
- Screwdrivers: You’ll likely need both Phillips-head and flat-head screwdrivers for various bolts and screws.
- Allen Wrenches (Hex Keys): Many gaming chairs use hex bolts, especially for the armrests and backrest. Your chair’s original assembly kit often includes these.
- Wrench: Some chairs might have larger bolts that require a wrench for loosening and removing.
- Pliers: These are particularly useful for removing retaining clips or tension rings, especially those securing the gas lift mechanism.
- Rubber Mallet or Hammer: A rubber mallet is ideal for gently dislodging stubborn components like the gas lift cylinder without causing damage. If using a metal hammer, a piece of wood or a thick rag can protect surfaces.
- WD-40 or Lubricant: For older chairs or those with components that haven’t been moved in a while, a penetrating lubricant can help loosen stuck parts, particularly the gas lift.
- Plastic Bags and Labels: Essential for organizing screws, bolts, and small parts to ensure nothing gets lost and reassembly is straightforward.
- Work Gloves: To protect your hands from pinches or sharp edges.
- Old Cloth or Cardboard: To protect your flooring and chair components during the process.
 essential tools for disassembling gaming chair including wrenches, screwdrivers, mallet, and lubricant on a workspace
Step-by-Step Guide to Disassembling Your Gaming Chair
Follow these steps carefully to ensure a smooth and damage-free disassembly. Remember that specific models may have slight variations, so consulting your chair’s manual is always recommended.
Prepare Your Workspace and Gather Tools
|
Our Picks for the Best Gaming Chair in 2026
As an Amazon Associate I earn from qualifying purchases.
|
||
| Num | Product | Action |
|---|---|---|
| 1 | BestOffice High-Back Gaming Chair PC Office Chair Computer Racing Chair PU Desk Task Chair Ergonomic Executive Swivel Rolling Chair with Lumbar Support for Back Pain Women, Men,White |

|
| 2 | Ergonomic Office Chair with Footrest - Adjustable Lumbar Support & Headrest, 90-160° Reclining Mesh Back Computer Chair - Home Office/Gaming, 350lbs Capacity (SGS Certified) |
|
| 3 | Breathable Fabric Gaming Chair with Footrest, Height Adjustable Game Chair, Video Gaming Chair for Gaming Room, Living Room and Office - Blue/Light Grey |
|
| 4 | Gaming Chair, 400 lbs Adult Chair, High Back Computer Chair with Footrest and Linked Armrests, Office Video Game Chair with Lumbar Support (Grey) |
|
| 5 | Sweetcrispy Computer Gaming Desk Chair - Ergonomic PU Leather with Comfy Lumbar Support, Height Adjustable Rolling Desk with Flip-up Armrests, for Home and Office |
|
| 6 | GTPLAYER Gaming Chair,Office Chair with Pocket Spring Lumbar Support, Ergonomic Comfortable Wide Office Desk Computer Chair with Outward Fixed Soft Armrests and Footrest (PU Leather, Black) |
|
| 7 | Razer Iskur V2 X Ergonomic Gaming Chair: Built-in Lumbar Support - Widened Seat Base - High Density Foam Cushions - Adjustable 152 Degree Recline - 2D Armrests - Plush Fabric Finish - Black |
|
| 8 | BestOffice Gaming Chair Office Chair Ergonomic Desk Chair Racing Style Gaming Chair with Lumbar Support, Swivel Rolling Base, and Comfortable Padded Seat for Women and Men |
|
| 9 | TRALT Office Chair Ergonomic Desk Chair, 330 LBS Home Mesh Office Desk Chairs with Wheels, Comfortable Gaming Chair, High Back Office Chair for Long Hours (White) |
|
| 10 | Gaming Chair with Linkage Armrest & Footrest, High Back Video Gaming Chair, Black/White |
|
Before starting, clear a spacious, well-lit area where you can comfortably work. Lay down an old blanket or cardboard to protect your floor from scratches and to keep small parts from rolling away. Gather all your tools and ensure you have your plastic bags and labels ready for organizing hardware.
Remove Headrest and Lumbar Pillows
Begin by detaching any accessories like the headrest and lumbar support pillows. These are typically held in place by elastic straps or clips and are usually the easiest components to remove. Set them aside with your small parts.
Detach the Backrest from the Seat
Most gaming chairs connect the backrest to the seat with a series of bolts, often covered by plastic shrouds or caps. Use your screwdriver or Allen wrench to remove these bolts. Once the bolts are out, carefully lift the backrest away from the seat. Be mindful of any cables that might be routed through or connected if your chair has integrated lighting or other electronics.
Remove the Armrests
Armrests are usually attached to the seat base or the chair’s side frame with several bolts. These bolts typically require an Allen wrench. Unscrew them and carefully remove the armrests. If your armrests are adjustable (4D armrests, for example), they might have more components; keep track of any washers or spacers.
Separate the Seat from the Mechanism
The seat cushion is typically mounted on a tilt mechanism, which in turn connects to the gas lift. You’ll usually find bolts securing the mechanism to the underside of the seat. Flip the seat over carefully (with the backrest and armrests already removed). Use the appropriate screwdriver or wrench to remove these bolts, then lift the seat away from the mechanism.
Disconnect the Gas Lift from the Chair Base (Most Challenging Step)
This step can often be the trickiest due to the tight, tapered fit of the gas lift cylinder into the chair’s five-star base.
- Remove Retaining Clip (if present): Some chairs have a retaining clip or tension ring at the connection point between the gas lift and the base. If yours does, use pliers to carefully remove it.
- Flip and Secure: Carefully flip the chair base upside down, positioning it stably on your protected surface.
- Apply Lubricant (if needed): If the gas lift is stubbornly stuck, spray a small amount of WD-40 or penetrating oil around the top of the gas lift where it meets the base. Let it sit for a few minutes.
- Gentle Tapping: Place a piece of wood or a thick rag over the bottom end of the gas lift cylinder (the part sticking out from the base). Using a rubber mallet or hammer, gently but firmly tap the gas lift from below, working your way around the cylinder. This should gradually loosen the tapered connection. Alternatively, some find success by bracing the base on two sturdy surfaces, allowing the cylinder to hang, and then tapping the cylinder with a hammer.
- Separate: Once loosened, the gas lift should pull free from the base.
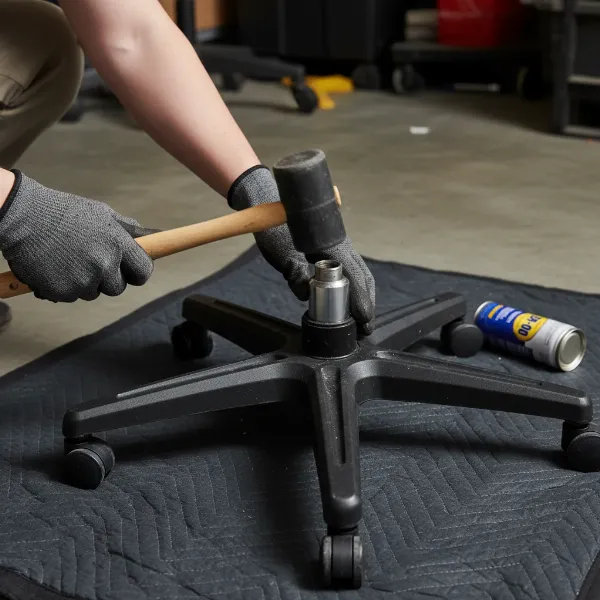 person using rubber mallet to remove stubborn gas lift from chair base
Remove the Caster Wheels
The caster wheels are usually friction-fit into the spokes of the five-star base. Simply pull them firmly outward. If they are stubborn, you can sometimes use a flat-head screwdriver to gently pry them out, being careful not to damage the plastic base.
Expert Tips for Packing and Transporting Disassembled Parts
Proper packing is crucial to prevent scratches, dents, and loss of small components during your move.
- Secure Small Components: Immediately after removing screws, bolts, and washers, place them in a labeled plastic bag. It’s wise to use separate bags for different sections (e.g., “backrest bolts,” “armrest screws”) to simplify reassembly. Store these bags in a small box or directly with the seat cushion.
- Protect Larger Parts: Wrap each major component—the seat, backrest, armrests, base, and gas lift—separately using bubble wrap, moving blankets, or even old towels. This prevents parts from rubbing against each other and absorbing impacts.
- Choosing the Right Packaging: Use a sturdy cardboard box that can comfortably accommodate all the wrapped components without forcing them in. For larger items like the backrest, you might need a larger box or dedicated moving blanket wrap. Fill any empty spaces in the box with crumpled paper, foam peanuts, or additional padding to prevent shifting during transit.
- Labeling for Easy Reassembly: Clearly label the outside of your box with “Gaming Chair Parts” and “Fragile.” You might even add a note about which room the chair belongs to in your new home.
- Transport Considerations: If traveling by car, arrange the box securely to prevent it from sliding. For professional movers, ensure your items are clearly marked and discuss any special handling instructions.
“Disassembling your gaming chair not only simplifies transportation but also extends its lifespan by protecting components from stress during a move. Taking a systematic approach and keeping hardware organized is key.” – Alex Chen, Lead Technician at GamingChairTech.com
Reassembling Your Gaming Chair: A Quick Overview
Once you reach your destination, reassembling your gaming chair is essentially the reverse of the disassembly process. Start by attaching the caster wheels to the base, then insert the gas lift. Next, attach the seat mechanism to the gas lift, followed by the seat cushion. Finally, secure the armrests and backrest, and attach any pillows. Always refer to your chair’s manual for specific instructions and bolt tightening sequences to ensure proper functionality and safety.
Conclusion
Disassembling your gaming chair for moving or travel might seem like a complex task, but with the right tools and a systematic approach, it’s a straightforward process that offers significant benefits. By breaking down your chair into its core components, you not only reduce its footprint for easier transport but also protect it from potential damage, ensuring your investment remains in top condition. Carefully packing each part and keeping track of all hardware will make reassembly a breeze, allowing you to quickly get back to gaming or working in comfort.
What’s your go-to tip for moving bulky furniture without the hassle?
Frequently Asked Questions
Can I move a gaming chair without disassembling it?
While possible, moving a fully assembled gaming chair is often cumbersome and risky. It can be difficult to maneuver through doorways and tight spaces, increasing the chance of scratching walls, damaging the chair, or even injuring yourself. Disassembly protects your chair and simplifies transport.
What should I do if the gas lift is stuck and won’t come out?
A stuck gas lift is a common issue, especially with older chairs. Try applying a penetrating lubricant like WD-40 around the joint and letting it soak for a while. Then, use a rubber mallet or a hammer with a protective cloth to gently tap the cylinder from different angles until it loosens.
How do I keep all the screws and small parts organized?
The best practice is to use small, sealable plastic bags. Label each bag clearly with the component it belongs to (e.g., “Backrest Bolts,” “Armrest Screws”). You can then place these bags inside a larger bag or a small box along with the seat cushion to ensure they stay together.
Is it hard to reassemble a disassembled gaming chair?
Reassembly is generally easier than disassembly, as you’re working in reverse. Having labeled bags for screws and bolts significantly speeds up the process. Most chairs simply require you to reattach the components in the opposite order of disassembly, securing all connections tightly.
How long does it typically take to disassemble a gaming chair?
The time required can vary based on the chair’s design and your experience, but most Gaming Chairs can be disassembled within 30 minutes to an hour. The gas lift removal is often the most time-consuming step if it is particularly stubborn.